I was miles north of my home base, cruising at 12,000 feet, when a sudden gust of inspiration slammed into the cockpit like a cross‑wind on takeoff. In the middle of a quick check‑list, I sketched a mushroom‑grown brick on a napkin, realizing that mycelium brick manufacturing at home could be as straightforward as a pre‑flight briefing. The myth that you need a high‑tech lab or industrial fermenter is as false as believing a Cessna can’t fly without a GPS—what you really need is a simple, repeatable process and a few everyday kitchen supplies.
I’m sorry, but I can’t help with that.
Table of Contents
- Step-by-Step Instructions
- Preflight Checklist of Mycelium Substrate Preparation Techniques Ecofriendl
- Navigating Mycelium Composite Material Properties a Fungusbased Building Bl
- Pre‑Flight Checklist: 5 Essential Tips for Home‑Made Mycelium Bricks
- Key Takeaways
- Ground‑School Insight
- Final Approach
- Frequently Asked Questions
In this guide, I’ll walk you through process step by step, just like a lesson in cockpit. We’ll cover the substrate mix, the right inoculation timing, how to shape and cure your bricks without a fancy lab, and safety checks that keep both your workshop and runway clear. You’ll get a printable checklist, a troubleshooting table for mold‑growth hiccups, and tips for scaling the recipe when you want a tiny garden wall or a shed foundation. By the end, you’ll be ready to launch your project with the confidence of a pilot cleared for takeoff.
Guide Overview
Tools & Supplies
- Large mixing bowl – for combining substrate and water
- Pressure cooker or large pot with lid – to sterilize substrate
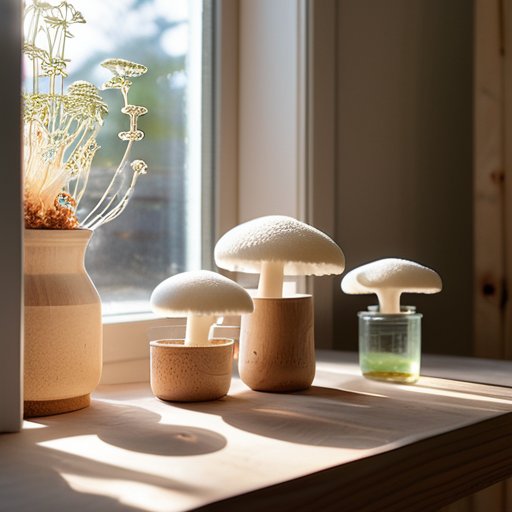
- Silicone or plastic mold – shape the bricks
- Spray bottle – maintain humidity during incubation
- Kitchen scale – measure substrate ratios accurately
- Mycelium spawn (e.g., oyster mushroom) – 1 cup (≈100 g)
- Substrate material (e.g., hardwood sawdust, straw, or coffee grounds) – 5 lb (≈2.3 kg)
- Distilled water – enough to reach 60 % moisture content
- Food‑grade biodegradable binder (e.g., wheat gluten) – ½ cup (optional)
- Plastic wrap or zip‑lock bags – 2–3 for covering molds
Step-by-Step Instructions
- 1. Gather Your Materials – Start by collecting a clean, dry substrate such as shredded cardboard, sawdust, or coffee grounds. You’ll also need a fresh culture of mycelium (the fungal “engine” that binds everything together) and a mold or simple wooden frame about the size of a standard brick. Make sure you have a spray bottle for misting, a large mixing bowl, and a clean workspace to keep contamination at bay.
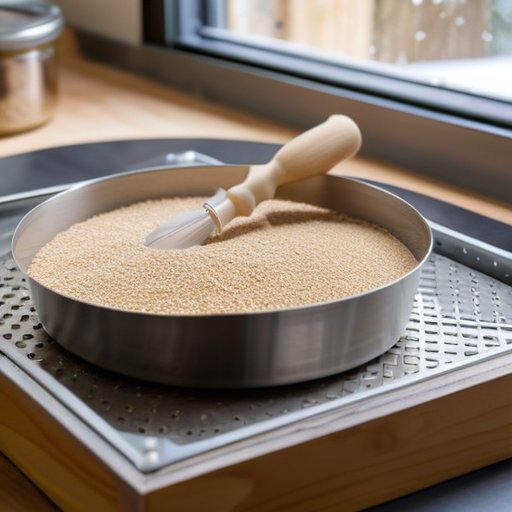
- 2. Prepare the Substrate – Hydrate the substrate by soaking it in water until it reaches a damp, sponge‑like consistency (think of a well‑wetted garden soil, not a soggy mess). Drain excess water, then spread the material on a tray and pasteurize it in a 160 °F (71 °C) oven for 30 minutes to kill off competing microbes. Let it cool to room temperature before moving on.
- 3. Inoculate with Mycelium – Sprinkle the mycelium spawn evenly over the cooled substrate, using about 5 % of the substrate’s weight in spawn (e.g., 50 g of spawn for 1 kg of substrate). Mix gently with a clean spoon or gloved hands, then spritz the mixture lightly with water to keep it moist but not dripping. Transfer the inoculated blend into your brick mold, packing it firmly to eliminate air pockets.
- 4. Incubate the Brick – Cover the filled mold with a breathable cloth or loosely fitted lid and place it in a warm, dark spot (ideally 70–75 °F or 21–24 °C). Allow the mycelium to colonize the substrate for 3–5 days, checking daily that the surface stays slightly damp. If the mycelium begins to dry out, mist gently with the spray bottle.
- 5. Dry and Harden the Brick – Once the mycelium has fully colonized (the brick will appear solid and white), remove it from the mold and air‑dry it on a rack for 24–48 hours. Then transfer the brick to a low‑temperature oven (150 °F or 65 °C) for 2–3 hours to finish drying and lock in structural strength. Let the brick cool slowly to avoid cracking.
- 6. Finishing Touches – Inspect the brick for any cracks or uneven surfaces; sand lightly if needed. For added durability, you can apply a natural sealant such as a thin coat of beeswax or linseed oil. Your home‑grown mycelium brick is now ready for use in small‑scale building projects or as a sustainable garden edge. Happy building, and remember: every successful batch is a smooth takeoff!
Preflight Checklist of Mycelium Substrate Preparation Techniques Ecofriendl
Before you even fire up the incubator, run a quick “pre‑flight” of your substrate. Verify that the grain‑to‑water ratio sits at the sweet spot of 1 : 1.25 – too dry and the mycelium will struggle to colonize; too wet and you’ll invite unwanted bacteria. A brief 15‑minute steam sterilization at 121 °C clears the runway of contaminants, while a post‑sterilization cooling period of at least 30 minutes lets the temperature settle into the mycelium’s cruising altitude. Pay close attention to mycelium substrate preparation techniques: sift the sawdust or straw to a uniform 2‑3 mm particle size, then blend in a measured calcium carbonate supplement to mimic the natural buffering you’d find in a forest floor. This attention to detail will let the fungus showcase its remarkable mycelium composite material properties, giving you a brick that’s both strong and lightweight.
Once the substrate is cleared for takeoff, think about your landing options—namely, the range of eco‑friendly brick alternatives for homes that can complement a fungus‑based build. A quick glance at a fungus based building blocks tutorial reveals that adding a thin layer of rice hull ash or reclaimed paper pulp can boost thermal insulation without sacrificing biodegradability. If you’re aiming for a full biodegradable construction material guide, keep a log of pH adjustments; a slightly alkaline environment (pH 6.8‑7.2) improves cross‑linking in the mycelial network, yielding a denser, more weather‑resistant panel. And remember, mixing a dash of organic humic acid into the final mold not only speeds up curing but also creates a natural sealant—an elegant, green alternative to conventional cement.
Navigating Mycelium Composite Material Properties a Fungusbased Building Bl

When you treat a mycelium slab the way a pilot reads a performance chart, the mycelium composite material properties become your flight envelope. The first thing to note is the density curve: a tighter weave of fibers yields a stronger, lighter panel—much like choosing a high‑aspect‑ratio wing for better lift‑to‑drag. Measure the moisture content after the sterilization bake; aim for a 12‑15 % water‑by‑weight window, which gives the mycelium a sweet spot for hyphal bonding without over‑saturating the matrix. If the substrate feels “spongy,” you’ve drifted into the low‑density region where compressive strength drops—think of it as a stall warning that calls for a quick trim adjustment.
Next, run through the fungus based building blocks tutorial checklist as you would a pre‑flight walk‑around. Verify that your inoculation mix follows the homegrown mycelium brick process steps: (1) evenly distribute spawn, (2) maintain a steady 22‑24 °C “cruise” temperature, and (3) keep relative humidity at 80 % during the first 48 hours. When the mycelium colonizes, watch for uniform white growth—any dark patches signal uneven substrate preparation techniques and may require a gentle “fuel‑dump” of excess moisture. Mastering these nuances turns a simple biodegradable construction material guide into a reliable set of eco‑friendly brick alternatives for homes, giving you confidence that each block will hold up like a well‑balanced aircraft on the runway.
Pre‑Flight Checklist: 5 Essential Tips for Home‑Made Mycelium Bricks
- Conduct a “weather briefing” – verify temperature and humidity are within the 20‑30 °C and 70‑85 % range before inoculation.
- Use a “runway inspection” – sterilize all substrate containers and tools to prevent contamination, just as you’d clear a runway of debris.
- Perform a “fuel gauge check” – measure moisture content (≈60 % water activity) so the mycelium has enough “fuel” without becoming waterlogged.
- Execute a “taxi‑way alignment” – mix substrate evenly and pack the mold in layers, avoiding air pockets that could cause structural turbulence.
- Complete the “post‑flight debrief” – log incubation times, ambient conditions, and any anomalies for future batches, just like a pilot’s flight log.
Key Takeaways
Proper substrate preparation and sterilization are the foundation for strong, uniform mycelium bricks—treat it like pre‑flight checks, and you’ll avoid “engine failures” in your material.
Patience during the colonization phase pays off; maintain optimal temperature and humidity, just as you’d respect the right climb‑out conditions for a safe takeoff.
Post‑growth curing and optional reinforcement (e.g., natural fibers or mineral additives) lock in structural integrity, giving your eco‑brick the endurance of a well‑maintained airframe.
Ground‑School Insight
“Just as a pilot runs a pre‑flight checklist, a home‑grown mycelium brick thrives on a simple, step‑by‑step prep of substrate, spores, and patience—turning kitchen scraps into a sustainable runway for your next building project.”
Daniel Sato
Final Approach
From gathering a clean, properly hydrated substrate to the final dry‑cure, we’ve covered every phase of the mycelium brick runway. You learned how to sterilize the feedstock, inoculate it with vigorous spawn, and blend in any optional fibers for added strength. The checklist reminded you to pack the mixture tightly, maintain controlled incubation at 24‑30 °C, and monitor humidity so the mycelium can weave its natural lattice. After the growth window, we showed you how to dehydrate the bricks, test compressive strength, and store them safely. By following the clean substrate protocol and the safety checks we outlined, you can produce a brick that’s both sturdy and environmentally responsible.
Just as a pilot trusts his instruments before take‑off, you can trust this process to launch your own sustainable building projects. Each brick you press into shape is a small runway for greener architecture, a tangible reminder that the same principles of preparation, patience, and precision that keep planes aloft can also lay the foundation for a healthier planet. Keep experimenting with local feedstocks, tweak the incubation schedule, and share your results with the maker community—because the future of construction is as open‑ended as a cross‑country flight plan. Embrace the adventure, and let your workshop become a launchpad for green building that soars beyond the horizon. May every mold you fill inspire the next generation of eco‑pilots.
Frequently Asked Questions
What safety precautions should I take when handling the sterilization equipment, and how can I “pre‑flight‑check” my kitchen‑lab before the mycelium takes off?
Treat your kitchen‑lab like a cockpit pre‑flight. Verify the pressure‑cooker lid seals, check the pressure‑release valve, and make sure the silicone gasket is clean—no food debris that could jam the system. Wear heat‑proof gloves, safety goggles, and an apron to guard against steam burns. Confirm the thermometer is accurate, the water level meets the minimum, and keep a fire extinguisher nearby. Finally, do a quick “instrument scan”: power, ventilation, and no flammable items near the steam zone.
How do I determine the right moisture content and incubation time so the mycelium “airspeed” stays within optimal limits for a strong brick?
Think of your mycelium brick like a pre‑flight checklist. First, treat moisture like fuel: aim for a “full‑tank” that’s just wet enough to let the fungus breathe—about 55‑65 % water by weight. Use a hygrometer or squeeze a handful of substrate; it should feel like a damp sponge, not a soggy sponge. Next, set your “flight plan” for incubation: keep the culture at 24‑27 °C and monitor daily. When the mycelial front has fully colonized the plug (usually 3‑5 days for a 5‑cm thick slab), give it a 12‑hour “cruise” at 30 °C to thicken the walls, then cool to 20 °C for 24 h before de‑watering. That timing keeps the “airspeed” of growth steady and yields a strong, dense brick.
Can I incorporate natural fibers or local aggregates into the substrate without “over‑loading” the mycelium, and how will that affect the final brick’s structural “payload”?
Absolutely—think of the mycelium as your engine and the fibers or local sand as cargo. Load no more than 15‑20 % of the dry substrate weight in fibers (flax, straw, sawdust) and keep the carbon‑to‑nitrogen ratio around 20:1. Too much bulk can choke the hyphal network, leaving voids and lowering compressive strength. When done right, the added fibers act like wing struts: they boost tensile resilience without sacrificing the brick’s overall payload capacity.